
Most people don’t think about lifting the hood when it’s time to wash their car. Even though you can’t see it, though, a dirty engine is actually worse for your vehicle than a dirty exterior. Built-up grease, fuel, and oil makes road dirt more likely to stick on engine components. When it does, it can damage wires and hoses, clog valves or pistons, and otherwise impede your vehicle’s performance.
One reason a lot of people don’t clean under their hoods is that they don’t know how. If you don’t have any experience with car repair, the engine can be intimidating. You don’t want to damage something in your attempt to clean it. The good news is, cleaning your engine can be as easy as washing the exterior. All it takes is the right cleaning solutions and a bit of knowledge about your engine block. We’ll break the process down step by step.
Supplies you’ll need
- Degreaser >>> Check on Amazon
- Plastic shopping bags
- Microfiber cleaning rags
- Stiff-bristled brush >>> Check on Amazon
Common mistakes to avoid
Car engines are designed to take a lot of abuse, but they’re not impervious to damage. On the flip side of this, touching your engine in the wrong place at the wrong time can cause serious injury. Here are some tips on things not to do that will help protect both you and your vehicle:
- Don’t use hoses and pressure washers. Some parts of your engine can get wet no problem, but the electronics can be ruined if they’re soaked with water. The same is true of some filters and mechanical components. A hose or pressure washer doesn’t give you the precision you need to avoid delicate components. Don’t use them to wash under the hood or you’ll risk a potentially serious (and costly) repair.
- Don’t clean your engine immediately after driving. A car’s engine gets extremely hot when it’s operating, and it takes a lot longer to cool down than most people expect. You can easily burn yourself if you touch the engine too soon after driving. A slightly warm engine is often easier to clean, but there are safer ways to accomplish this, such as waiting for a hot day, or giving the engine a few passes with a hair dryer.
- Don’t use soapy cleaners. While many dish soaps can do a number on grease, but they’re nowhere near as powerful as an automotive degreaser. They also generate suds and can leave behind residue. Dish soaps are great for cleaning spilled gas or oil from your trunk or upholstery, but they’re not the best choice for cleaning your engine block.
How to clean under the hood of a car: Step by step
Step 1: Prepare your space and vehicle.
Once you wash your engine, all that gross muck has to go somewhere. To keep it from staining your garage floor (or going into the water supply), you should put a drip pan under your engine. Absorbent mats or extra rags can be laid down, as well, if you don’t have a pan or are worried it won’t catch all the mess.
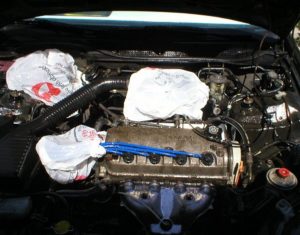
You’ll also want to cover up any delicate components in your engine. Most parts of your engine will be okay if they get a little bit wet, but there’s no reason to take any chances. Plastic shopping bags work great for this since you can tie the handles together to secure them.
Which components should you cover-up? The short answer is anything that can be damaged by moisture and is important to your car’s operation. This includes the alternator, distributor, fuse box, spark plug holes, and open sensors. You should also cover major electrical components. If you’re not sure what or where these are, your vehicle’s manual can give you a hand.
Step 2: Remove large debris.
Dead leaves are especially prone to being sucked into the engine, but even heavier objects like sticks can get trapped under the hood. Pull any visible debris out of the engine by hand. Don’t forget to remove it from the grille and the bottom of the windshield, too. If there’s any debris you can’t reach, a leaf blower or stream of compressed air should do the trick.
Step 3: Apply degreaser.
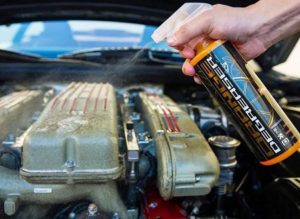 Simple water isn’t very effective against the kind of greasy grime that gets on a car engine. A degreaser is a much better option for breaking up oil and fuel residue that’s clinging to your engine components, allowing them to be washed clean.
If your engine isn’t too dirty, simply coat the block with the degreaser and move on to the next step in your cleaning. For a more serious clean, you can let it soak for up to 20 minutes before you start to scrub. You can find great engine degreasers on Amazon.
Step 4: Scrub and rinse.
Scrub all the surfaces of the engine with a rag. You can use a stiff-bristled brush to get off any caked-on build-up. Wire or hard plastic bristles can both be used. After your first scrub, rinse the engine bay by wringing clean water onto it from clean towels. You may need to repeat this process a few times to fully clean your engine.
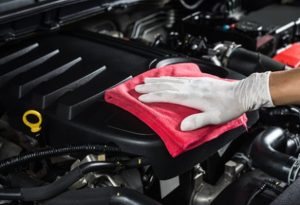 Step 5: Dry your engine and clean up your area.
Air-drying is the best option when it comes to your engine. Remove all the plastic coverings from the delicate components and leave the hood propped open. The best place for this is a garage with the door open since that will allow great airflow while still keeping your engine block protected from the environment.
You should also dispose of the run-off from your engine. Don’t simply dump it out on the street or pour it down the drain. Fuel, oil, and other automotive fluids are some of the most problematic pollutants if they get into the water source. Pouring them on the street or soil just delays the release of these chemicals until the next time it rains.
Use a funnel to pour the contents of the drip pan into a plastic or metal container designed for holding fuel or oil. Many automotive repair stores will dispose of this liquid for free, though you should call ahead to make sure before you take it in.
A final word on cleaning under the hood
Cleaning your engine is a relatively quick and easy process—the longest part will likely be the time spent allowing it to dry. The key is knowing which parts of the engine you should wash, and which parts you shouldn’t.
After your car has finished drying, it’s an excellent time to check the engine for any other issues. Look over the wiring to make sure they’re all firmly connected and check for damage on the vacuum hoses. It’ll be easier to see this damage when the engine is clean. This will also make sure you catch any wires that were accidentally knocked loose during the cleaning.
Hopefully, this step by step guide as demystified the engine cleaning process! Take a look under your hood to see if your engine could use a good scrub. You may be surprised by how it improves your car’s performance.